
Build a Customer Portal or Microsite
Use CareCloud REST API to integrate with your customer portal or a web microsite for your customers
Setup and integration
Here, you will find the complete developer's Guide to CareCloud platform REST API integration with your application. Please read and learn more about the integration process and make the first steps easier and simpler with Quickstart. You can learn how to use our REST API and create the first API calls. This guide enables easy authentication and safe calling with full respect to your data security. You find here the description of API parameters and versioning, URL structure, error codes, and HTTP verbs.
Enjoy the CareCloud platform REST API Guide!


Quickstart
Are you new here? Launch with Quickstart!
Learn how to use REST API
Your first API call

Authentication
Learn how to authenticate to REST API
How to get and use bearer token?
Use REST API safe and sound
API tools set
You will find here the easy way how to start using CareCloud API. Just download the collection and import it into your Postman installation. In a matter of minutes, you can do API calls on your own. Moreover, you learn here how to use CareCloud API SDK, the convenient wrapper around CareCloud PHP Client, starting with installing the package, creating your API client, and accessing all the API endpoints from the client object.
Here, you will find the API client in PHP with a quick integration base to customize your implementation. Open API 3.0 documentation helps you generate your API client and provides the Open API tools set.
Postman Collection
Install your Postman or access it online
Download CareCloud API collection
See the first API calls easy guide
SDK in PHP
Easy integration
REST API SDK with full list of resources
Best practice implemented
PHP API client
Quick integration base
Customize your implementation
Access all API endpoints
Use cases
You will find here detailed descriptions of specific use cases for your needs. Get inspired by describing the best practices for integrating CareCloud platform REST API with your application and make your work easier. Using the related use cases will save you time and money!
- To successfully sign up for a customer, you have to collect all the customer information. That might require using other CareCloud API resources. This process must be done before creating a customer account by [POST] /customers.
- We will show you how to use resource stores, customer sources or customer properties for the use case. To get all options for store_id, you should call [GET] /stores. You will get a response containing the list of stores and their unique IDs.
- Use the values in the sign-up form to let the customer pick the correct one. Store it for later use of [POST] /customers.
- Now, you need to know what kind of customer source will be set to the customer. The customer source identifies the place/system/business where your customer came from. In short, it is his origin.
For example, one customer source could be an e-shop (the customer was registered through an e-shop), and another could be brick-and-mortar, so you know he was registered in a store.
Every customer source record of the customer can have an external ID. The ID represents the identification of the customer in that system. Later, you can search customers by this ID to synchronize between systems.
You can call [GET]/customer-sources to get a list of customer sources. Pick the one that fits the source and add an ID to the customer creation request in the following steps. - The customer's properties could be set directly in [POST] /customers or afterward if necessary with endpoint [POST] /customers/{customer_id}/property-records. Lists of all properties are available at [GET] /customer-properties.
- Use the method [POST] /customers to create a customer account. Set store_id as the registration branch of a customer account and customer_source_id as a source of the customer registration.
- Repeat POST method calls if you need to set other resources to the customer account.
The use case can apply to mobile application or customer portal integration, where you need access to data logged in customer.
We recommended searching customer’s data following way:
- To access customer data in this use case, it is mandatory, the customer is logged in. If you need to know ho to login customer please look at Log in and log out customer use case
- To access personal data of the customer please use resource GET /customers.
- You don’t need to add any path or query parameter. CareCloud API will return information about logged in customer.
- The response contains customer information, including ID, personal data, or consent, that you can process as needed.
- In case you want to access extended data about customer - his properties, please use the following endpoint GET customers/property-records.
The use case can apply to mobile applications or customer portal integration, where you have to log in to a customer account to access his personal information or other data.
This process requires the device to have an application token to access CareCloud API. How to get and use application tokens is available in the Authentication section.
We recommend you create a login process following way:
- The first step is to receive your customer's login and password through your application's login screen. Since the verification of credentials is on the CareCloud servers for security reasons, you don't need to store the customer's login and password in the application.
- After the customer submits the form, the application should validate login (usually email address) and password against requirements from CareCloud API documentation.
- Successful validation triggers the login action method called POST /tokens/{token_id}/actions/login.
- If an error message is returned, you need to follow guidance depending on the message.
- In case of a successful result, the application will receive customer identification.
- You can call most of the resources in CareCloud API without the identification of the customer if the customer is logged in. For example, information about the logged-in customer is available at the endpoint GET /customers. The ID is not necessary, CareCloud recognizes the customer and returns his information.
- Call the API action method GET /tokens/{token_id}/actions/logout if your customer requests a logout.
- After logging out, the application can call only resources available without logged-in customers.
- There are only two ways to log out a customer, one is a logout method, and the other one is when the application token loses validity. You can read more about application token in the use case "Mobile application/customer portal access to CareCloud API"
Updating the customer is a critical process, and it is crucial to do it right so you keep the customer's data. For an update, please follow this use case:
- For an update, you need to know the customer's original data first. If you don't store all the customer’s data in your system, you need to call information about the customer with API call GET /customer, where you will receive all the customer data. Now you are good to go for customer updates.
- When you have the customer’s data, you can modify them and update them with endpoint PUT /customer. This endpoint has to contain all the customer information because you are updating all customer data. All parameters that won't be set in the request will be lost because of the principle of the HTTP PUT verb.
- The successful update is represented by 204 HTTP code. In case of an error, the error message explains the issue.
- If you need to update a customer’s properties, please use endpoint PUT /customers/property-records/{property_record_id}. There you can modify existing properties.
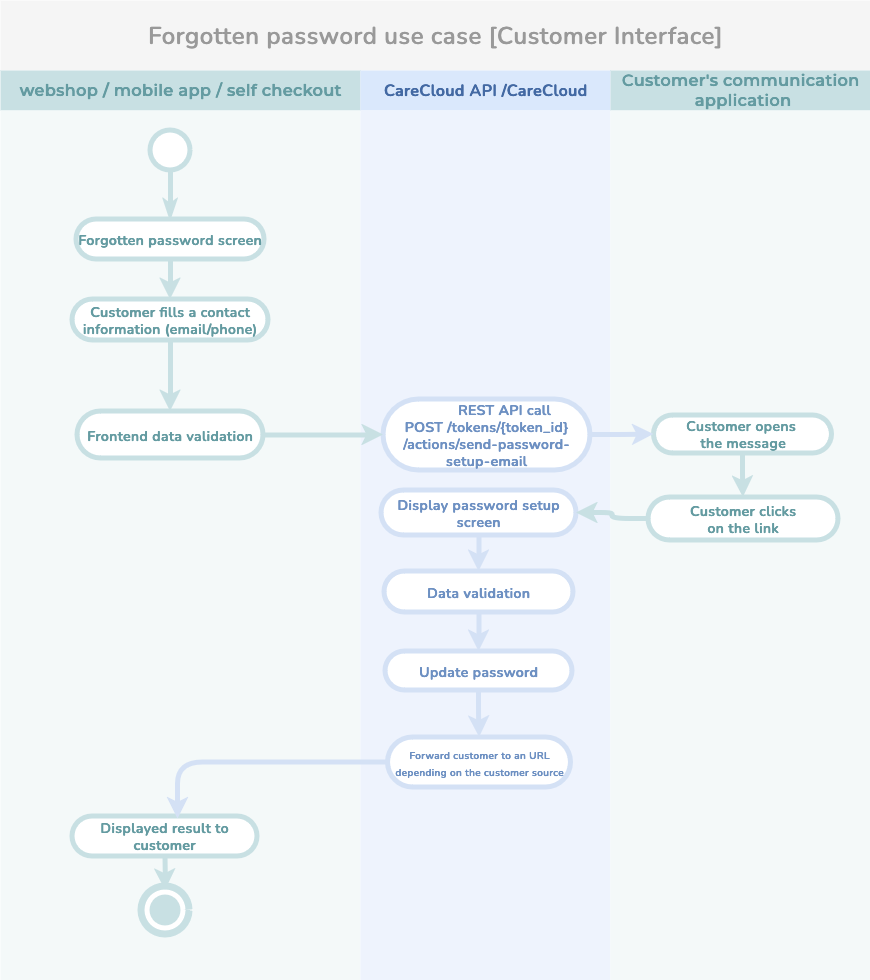
The use case can be applied to the mobile application or customer portal integration, where a customer needs to change his password in CareCloud.
We recommended changing the customer's password following way:
- The customer can request a change if he doesn't remember his password. All passwords are securely saved and protected on the CareCloud servers, so the customer's application doesn't need to store passwords and risk the application data leak.
- The customer fills in the contact information(email, phone number, or others if the project allows it) to the form. The application validates the contact structure.
- The application sends a request to the CareCloud action method POST /tokens/{token_id}/actions/send-password-setup-email
- The CareCloud validates the contact and checks its existence in the customer database. If the contact is present, CareCloud sends a message with the link to change the password. CareCloud users can configure the contact(email/phone) template in the CareCloud application Campaigns & Segmentation if needed.
- The customer opens the message and clicks on the link.
- The customer is forwarded to the form for password change in CareCloud.
- The customer fills out the form with a new password, and the application validates the amount and type of the characters in the password.
- After successfully changing the password, the customer is forwarded depending on the customer source he has assigned. Forward URL is possible to set up at the customer source administration in CareCloud.
CDP CareCloud creates a customer account if it doesn't exist and adds a customer source dedicated to newsletters. This use case covers existing customers, customers who signed up for the newsletter, and new customers.
Customer source identifies the source of the customer (email, Facebook, registration, campaign summer 2021). It will tell you what the source of sign-up or registration is. Customers can have multiple customer sources.
- You need to decide which customer source to use for the newsletter sign-up. A list of available customer sources is available in resource [GET] /customer-sources.
- If you want to create a new customer source for an existing customer, you can do it at [POST] /customers/{cusomer_id}/customer-source-records.
- When you have all the necessary data, you can call the action method POST /customers/actions/newsletters-sign-up. The method creates a customer if one does not exist and sets all concerts passed from the request and contact source.
If it's a customer who has already signed up for the newsletter and wants to register, you don't have to worry. Just follow the sign-up use case. CDP & CRM CareCloud will handle this situation.
Marketing automation events are used to launch a scenario connected to an event. The scenario covers any available automation in the CareCloud platform.
Marketing Automation Events has the following structure of resources:
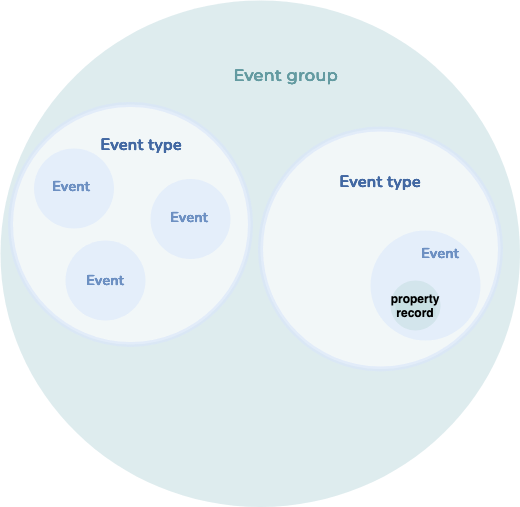
Event group: It is a general definition of an event. As an administrator, you can define event types that describe the behavior and structure of following events.
Event Properties: A list of properties is defined with the event type. It is a good way to extend the event type possibilities.
Event: It is a resource that allows you to create an event for a specific customer. The event starts a Marketing Automation scenario. It can transfer data to the scenario. Marketing automation scenarios can use the data to make better decisions during their run.
Event property record: It contains property values connected with an event.
Create an event
- If you want to create an event through CareCloud REST API, know what event you wish to create. Correctly set it up, and check if it contains all the necessary properties. If you need to create a new event group, you can do it in the events section of the CareCloud administration. You can also create a new event type or property there. When everything is set up in CareCloud administration, we can go to the next step.
- First, you must decide what event type you want to create an event. To help you decide, you might select an event type depending on the event group. List of the groups you can list with API call of resource GET /event-groups.
- Depending on the results, you can select a list of event types that fits your event group or use other criteria from GET /event-types.
- If you decided on an event type that fits your use case, you could check if you need to use any of the available properties here GET /event-properties.
- Now is the time to create an event for a specific customer. The creation of events also contains values of properties. You set property records in events resource because we need to have all data available for the MA scenario in one API call to start immediately after. Call the method POST /events with parameters.
Customer account operations
- To successfully sign up for a customer, you have to collect all the customer information. That might require using other CareCloud API resources. This process must be done before creating a customer account by [POST] /customers.
- We will show you how to use resource stores, customer sources or customer properties for the use case. To get all options for store_id, you should call [GET] /stores. You will get a response containing the list of stores and their unique IDs.
- Use the values in the sign-up form to let the customer pick the correct one. Store it for later use of [POST] /customers.
- Now, you need to know what kind of customer source will be set to the customer. The customer source identifies the place/system/business where your customer came from. In short, it is his origin.
For example, one customer source could be an e-shop (the customer was registered through an e-shop), and another could be brick-and-mortar, so you know he was registered in a store.
Every customer source record of the customer can have an external ID. The ID represents the identification of the customer in that system. Later, you can search customers by this ID to synchronize between systems.
You can call [GET]/customer-sources to get a list of customer sources. Pick the one that fits the source and add an ID to the customer creation request in the following steps. - The customer's properties could be set directly in [POST] /customers or afterward if necessary with endpoint [POST] /customers/{customer_id}/property-records. Lists of all properties are available at [GET] /customer-properties.
- Use the method [POST] /customers to create a customer account. Set store_id as the registration branch of a customer account and customer_source_id as a source of the customer registration.
- Repeat POST method calls if you need to set other resources to the customer account.
The use case can apply to mobile application or customer portal integration, where you need access to data logged in customer.
We recommended searching customer’s data following way:
- To access customer data in this use case, it is mandatory, the customer is logged in. If you need to know ho to login customer please look at Log in and log out customer use case
- To access personal data of the customer please use resource GET /customers.
- You don’t need to add any path or query parameter. CareCloud API will return information about logged in customer.
- The response contains customer information, including ID, personal data, or consent, that you can process as needed.
- In case you want to access extended data about customer - his properties, please use the following endpoint GET customers/property-records.
The use case can apply to mobile applications or customer portal integration, where you have to log in to a customer account to access his personal information or other data.
This process requires the device to have an application token to access CareCloud API. How to get and use application tokens is available in the Authentication section.
We recommend you create a login process following way:
- The first step is to receive your customer's login and password through your application's login screen. Since the verification of credentials is on the CareCloud servers for security reasons, you don't need to store the customer's login and password in the application.
- After the customer submits the form, the application should validate login (usually email address) and password against requirements from CareCloud API documentation.
- Successful validation triggers the login action method called POST /tokens/{token_id}/actions/login.
- If an error message is returned, you need to follow guidance depending on the message.
- In case of a successful result, the application will receive customer identification.
- You can call most of the resources in CareCloud API without the identification of the customer if the customer is logged in. For example, information about the logged-in customer is available at the endpoint GET /customers. The ID is not necessary, CareCloud recognizes the customer and returns his information.
- Call the API action method GET /tokens/{token_id}/actions/logout if your customer requests a logout.
- After logging out, the application can call only resources available without logged-in customers.
- There are only two ways to log out a customer, one is a logout method, and the other one is when the application token loses validity. You can read more about application token in the use case "Mobile application/customer portal access to CareCloud API"
Updating the customer is a critical process, and it is crucial to do it right so you keep the customer's data. For an update, please follow this use case:
- For an update, you need to know the customer's original data first. If you don't store all the customer’s data in your system, you need to call information about the customer with API call GET /customer, where you will receive all the customer data. Now you are good to go for customer updates.
- When you have the customer’s data, you can modify them and update them with endpoint PUT /customer. This endpoint has to contain all the customer information because you are updating all customer data. All parameters that won't be set in the request will be lost because of the principle of the HTTP PUT verb.
- The successful update is represented by 204 HTTP code. In case of an error, the error message explains the issue.
- If you need to update a customer’s properties, please use endpoint PUT /customers/property-records/{property_record_id}. There you can modify existing properties.
The use case can be applied to the mobile application or customer portal integration, where a customer needs to change his password in CareCloud.
We recommended changing the customer's password following way:
- The customer can request a change if he doesn't remember his password. All passwords are securely saved and protected on the CareCloud servers, so the customer's application doesn't need to store passwords and risk the application data leak.
- The customer fills in the contact information(email, phone number, or others if the project allows it) to the form. The application validates the contact structure.
- The application sends a request to the CareCloud action method POST /tokens/{token_id}/actions/send-password-setup-email
- The CareCloud validates the contact and checks its existence in the customer database. If the contact is present, CareCloud sends a message with the link to change the password. CareCloud users can configure the contact(email/phone) template in the CareCloud application Campaigns & Segmentation if needed.
- The customer opens the message and clicks on the link.
- The customer is forwarded to the form for password change in CareCloud.
- The customer fills out the form with a new password, and the application validates the amount and type of the characters in the password.
- After successfully changing the password, the customer is forwarded depending on the customer source he has assigned. Forward URL is possible to set up at the customer source administration in CareCloud.
Newsletter sign-up and other operations
CDP CareCloud creates a customer account if it doesn't exist and adds a customer source dedicated to newsletters. This use case covers existing customers, customers who signed up for the newsletter, and new customers.
Customer source identifies the source of the customer (email, Facebook, registration, campaign summer 2021). It will tell you what the source of sign-up or registration is. Customers can have multiple customer sources.
- You need to decide which customer source to use for the newsletter sign-up. A list of available customer sources is available in resource [GET] /customer-sources.
- If you want to create a new customer source for an existing customer, you can do it at [POST] /customers/{cusomer_id}/customer-source-records.
- When you have all the necessary data, you can call the action method POST /customers/actions/newsletters-sign-up. The method creates a customer if one does not exist and sets all concerts passed from the request and contact source.
If it's a customer who has already signed up for the newsletter and wants to register, you don't have to worry. Just follow the sign-up use case. CDP & CRM CareCloud will handle this situation.
Marketing automation events are used to launch a scenario connected to an event. The scenario covers any available automation in the CareCloud platform.
Marketing Automation Events has the following structure of resources:
Event group: It is a general definition of an event. As an administrator, you can define event types that describe the behavior and structure of following events.
Event Properties: A list of properties is defined with the event type. It is a good way to extend the event type possibilities.
Event: It is a resource that allows you to create an event for a specific customer. The event starts a Marketing Automation scenario. It can transfer data to the scenario. Marketing automation scenarios can use the data to make better decisions during their run.
Event property record: It contains property values connected with an event.
Create an event
- If you want to create an event through CareCloud REST API, know what event you wish to create. Correctly set it up, and check if it contains all the necessary properties. If you need to create a new event group, you can do it in the events section of the CareCloud administration. You can also create a new event type or property there. When everything is set up in CareCloud administration, we can go to the next step.
- First, you must decide what event type you want to create an event. To help you decide, you might select an event type depending on the event group. List of the groups you can list with API call of resource GET /event-groups.
- Depending on the results, you can select a list of event types that fits your event group or use other criteria from GET /event-types.
- If you decided on an event type that fits your use case, you could check if you need to use any of the available properties here GET /event-properties.
- Now is the time to create an event for a specific customer. The creation of events also contains values of properties. You set property records in events resource because we need to have all data available for the MA scenario in one API call to start immediately after. Call the method POST /events with parameters.
If you want to inform a customer about his abandoned cart, you can trigger a scenario in the Marketing Automation application following the use case Create a marketing automation event.
There are currently two options for how you can deal with it:
- You will make a decision in your application or e-shop when the basket becomes abandoned. After that, you will create a marketing automation event.
- If you can't decide on the e-shop side, you can create a marketing automation event every time the shopping cart is updated and resolve the abandoned login directly in the Marketing Automation application scenario in CareCloud.
This use case explains how to find and display a customer's digital stamp card, including active campaigns, collected stamps, and any rewards or bonuses earned by reaching special checkpoints.
What is Stamper?
The Digital Stamper simulates a traditional store loyalty program, allowing customers to collect digital stamps with each purchase. Stamps are securely stored and linked to a unique customer ID for accurate tracking. Once a customer collects a certain number of stamps, they automatically receive a reward. Campaigns can also include expiration rules, tiered rewards, and bonus checkpoints. The digital format removes the hassle of physical cards and helps businesses increase engagement with a seamless loyalty experience.
How to display Stamper data for the customer?
- Find the right campaignStart by retrieving a list of stamper campaigns using GET /stamper-campaigns . You can filter the list to show only active campaigns relevant to your customer.
This endpoint also supports accessing past campaign history. The response includes the full campaign definition—such as the number of stamps required, rewards, bonus checkpoints, and other campaign rules. - Get the customer’s stamper cardOnce you've identified the correct campaign, fetch the customer’s active stamp card using GET /stamper-cards. You can filter by both customer ID and campaign ID. You can also filter multiple cards using an array in query parameter for stamper campaign ID.
It’s possible for a single customer to have multiple stamp cards within one campaign (e.g. if they completed a card and started a new one). You can filter the response to show only active (not yet completed) cards or retrieve all cards for a full campaign history. - Retrieve the list of stampsTo see which stamps the customer has collected, use GET /stamps. This endpoint returns a list of stamps, which can be connected to both the customer and their stamp card.
The list of stamps is also available in the structure of each stamper card. You can use both ways depending on your use case.
Each stamp includes details about:- Which purchase triggered the stamp.
- The position of the stamp on the card (e.g. 1st, 5th, 10th). That helps you to see what bonus was achieved (Check bonus definition in stamper campaign).
- What condition was fullfiled with that stamp (The list of condition is available in the stamper campaign).

UNISCITI AL NOSTRO CLOUD
Sei pronto ad incontrare CareCloud?
Compila i tuoi dati di contatto per ottenere risposte alle domande che hai su CareCloud: dalla descrizione del prodotto ai prezzi, oppure una chiacchierata informale sui tuoi clienti e sulla tua attività.
Uno dei nostri esperti ti contatterà quanto prima possibile.
Inviando questo modulo, confermi di accettare il trattamento dei tuoi dati personali da parte di Cortex e di essere contattato per soddisfare la tua richiesta. I tuoi dati saranno eliminati dopo che avremo soddisfatto la tua richiesta, a meno che non venga stipulato un accordo reciproco per un ulteriore trattamento. I tuoi dati sono al sicuro.